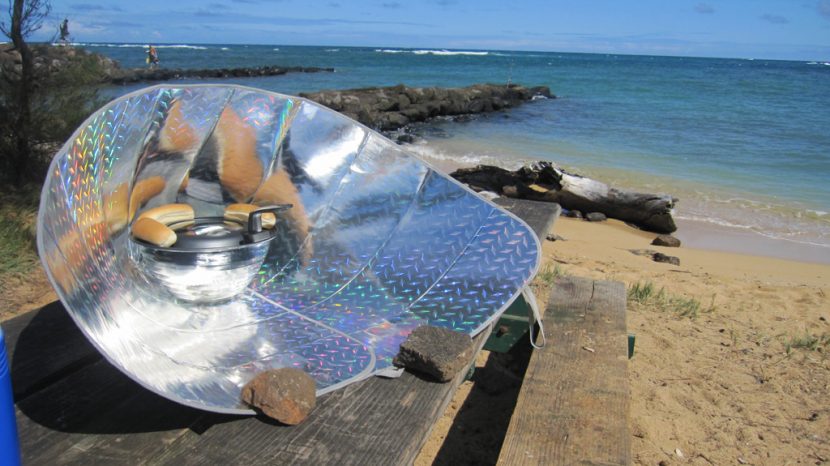
Three More DIY Survival Hacks – The Solar Funnel Cooker is Fantastic

As a continuation of our last post on DIY survival hacks you should be able to do on your own at home, here are three more such hacks:
Rocket Stove
Knowing how to build a rocket stove is important for being able to cook food when you are unable to use any of the appliances in your kitchen.
Here’s how you can build one:
ITEMS NEEDED:

- #10 can (make sure it comes with a lid)
- 28-ounce cans x3
- Dremel (or chisel)
- Work gloves (heavy duty)
- Marker or Sharpie
- Dryer lint

DIRECTIONS:
- Take a lid from a smaller can, place it over the side of your #10 can, and then trace around it with a marker.
- Cut a hole based on the marker lines – this way, the smaller can should be able to fit into the larger can.
- Now, take the piece you just cut out of the #10 can and place it over the top of your smaller can.
- Trace and cut; this will serve as your chimney.
- There should be one can left that you have not touched yet; remove the rim from this can.
- Make 1.5-inch tabs around the can and then squeeze it through both of the other cans.
- Fold up the tabs to ensure the fit is nice and snug.
- With your top lid, trace a circle in the middle using one of the smaller cans and cut it out.
- Cut eight tabs around the large can.
- Pack out the can with insulation.
- Fold down four tabs with a hammer and place the lid with the circle that has been cut out into it on top.
- Hammer the rest of the tabs into place to secure the lid.
- Cut out a rectangular piece of metal with flaps that will fit inside – you may need to hammer the metal in order to make it flat.
- Cut a one-inch slit on both sides of the can.
- Now, proceed to slide your shelf into place and hold down the flaps.
- Place some dryer lint into the middle of the can.
- Light it up to start cooking!
Solar Cooker
Another cooking device that you can easily make is a solar cooker, which utilizes the sun’s heat in order to cook food or boil water.

ITEMS NEEDED:
- Car sunshade (reflective)
- Velcro (at least 4 inches)
- Cake rack or grill
- Bucket
- Baking bag (plastic)
- Glue or Duct tape
DIRECTIONS:
- Lay out the car sunshade – make sure the notched end is facing toward you.
- Cut your Velcro into three pieces; each piece should be at least 1 inch long.
- Stick one half of each Velcro piece onto the edge of the car sunshade to the left of the notch. You may need glue or duct tape or something similar in order to complete this.
- Now, attach the matching half of each of the pieces onto the underneath side to the right of the notch so that they will fit together when you bring them together to make a funnel.
- To align the pieces, stick down one side of your Velcro and then press two pieces of Velcro together.
- Fold the shade into the shape of a funnel, and stick it down on your second side.
- Press the pieces of Velcro together to make the funnel.
- Set the funnel on top of your bucket.
- Take a black pot and place it on top of your square cake rack, which in turn should be placed inside of your baking bag.
- The standard size of a cake rack is around ten inches, so it should easily be able to fit in your funnel. The idea is that the rack rests on top of the bucket and supports the pot as the car sunshade is too soft to do this. It will also enable the rays of the sun to shine over the pot and create heat on each of the sides.
- Tilt the funnel in the direction of the sun. You may need a stick to stabilize it.
- With enough sunlight, your solar cooker will heat up to 350 degrees Fahrenheit.
Beef Tallow
Beef tallow can be used for both skin care and cooking purposes.
ITEMS NEEDED:

- Beef fat (quality works best)
- Slow cooker
- Food processor (optional)
- Parchment paper
- Glass jars (clean, as they will be used for storage)

- Cheesecloth
- Knife
- Patience (not an item, but still needed!)
DIRECTIONS:
- Start by trimming the beef fat with your knife or sharp edge.
- Proceed to chop up your beef into chunks that are more manageable, and continue to trim more fat and gristle from it.
- Run the fat through your food processor until it gains a consistency very similar to that of ground meat.
- If you do not have a food processor or are unable to use one, simply chop up the meat into very small pieces instead or shred it apart with forks.
- Set your slow cooker to a low heat.
- Dump the shredded fat into your slow cooker. Over several hours, it should melt down. Give it around four to five hours at the very least, and stir occasionally. The impurities of the fat will begin to rise to the top as it melts.
- When there is a clear liquid at the bottom of the cooker with crispier pieces at the top, it is done.
- Pour the melted fat onto parchment paper.
- Allow the fat to harden up; it should turn a creamy white color.
- Cut the hardened fat up into bars.
- Place the bars into your glass jars for storage.

