A number of people, both in the UK and U.S. have been asking me for more detailed instructions on how I make my canvas/denim “micarta”…..which I now call Jcarta ’cause I’m tired of typing quotes. I have sent out e-mails describing the procedure, but without photos. However, since I still keep getting requests for a photo version, here it is.
1. Material:
For denim, you can either cut up old jeans or buy the denim cloth by the yard(meter?) at a fabric store. Other sources are “thrift” stores or Yard/garage sales(popular here in the states). I cruise the sales and pick up old, adult sized jeans for a dollar or less, usually.
The only criteria is that they have to be clean. Any stain or discolouration that can’t be washed out WILL show up after you glue the slabs to your knife and are about done with the shaping. Faded is ok.
2. Size:
I cut the jeans into strips 11 inches X 2 inches(28 cm x 5 cm). It’s enough for one set of slabs. With denim, I cut 22 strips. This gives me finished slabs that are around 3/8 inch(1 cm) thick at the end. 22 strips work out to about 3/4 inch (1.7 cm) prior to the resin/clamping.
3. Resin:
I use either Elmer’s all-purpose fiberglass resin or Bondo fiberglass resin. Both are marine rated. I get them in our local DIY stores. They come with a tube of hardener, but I usually buy a separate tube since the one supplied never seems to be quite enough. Read the directions carefully concerning the amount of hardener each brand requires. I found that out the hard way (pun intended).
4. Required Materials:
I keep it simple since I’m only making enough for one set of slabs. From left to right, top to bottom:
TOP:
clean coffee can(any clean container you don’t need will do), resin, disposable gloves, small, clear glass to measure hardener into, plastic one cup(1/4 liter, 250 ml) measuring cup, old wooden spoon for mixing resin/hardener..anything will do.
MIDDLE:
wax paper(plastic bags are also reported to work), wooden clamping slabs 12 inches long x 3 3/4 wide.(30 cm x 4.5cm). Any hard, smooth material can be used.
BOTTOM:
Disposable foil baking pan( for “drippings). Heavy C-Clamps…in this case one 8(20 cm) inch clamp and two 6(15cm) inch clamps, old wooden board to work on, since the boards on my outdoor table are warped.
5. Starting:
After you’ve assembled all your materials, and have laid down wax paper or plastic bags/film on your work area, the first step is to measure our the resin and hardener, and mix. Have everything ready to go, because you have about 15 minutes to work if the temperature is below 70F/21C…much less if it’s hotter than that.
The resin I’m using calls for 14 drops of hardener per ounce and my 1 cup measuring cup holds 8 oz, so that’s 112 dops of resin…a bit much to measure out each time you go to do this. So what I did was buy the small clear cup, measure 112 drops into it, and mark the line with a very fine indelible pen. Saves time and aggravation. The resin, of course, is just poured into the measuring cup.
Mix thoroughly:
Layering:
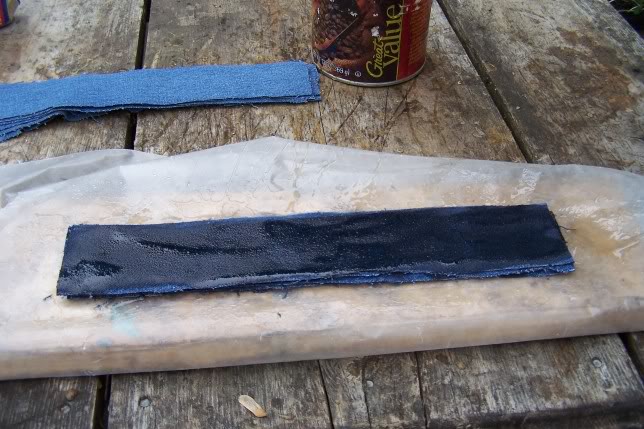
I lay the first strip on the wax paper covered surface, and pour a line of resin down the middle. It’s then spread with my gloved fingers so the entire surface is covered with resin. This is repeated for all the strips.
The finished layers look like this:
6. Clamping:
After the last layer is on, I press down with my fingers as hard as I can to get the layers initially stable. This stuff can be a bit slippery when wet. After that, I wrap them in the wax paper and slide them onto the bottom clamping slab. Add the top one, and then clamp starting in the middle.
Be very careful that your clamp is positioned in the center of the material, or you’ll find yourself with a slab that is thicker on one side. Once the center clamp is on, add the two end one. I then screw them down as absolutely tight as I can using hand/arm pressure.
Depending on how absorptive your material is, excess resin, may or may not start running out from the clamps. If it does, I position the clamped boards so the resin flows into that old foil pan.
7.
At this point you’re done with the hardest part. Let the clamped material harden overnight, and then unclamp and peel off the wax paper/plastic. I let the slab harden for 3 days at temperatures around 70f/21c. In these last pics, you see the slab along with a yellow canvas one I’d done the week before and had trimmed up a bit.
8. Working the material:
I find the best way to cut/trim the slab into usable pieces is with a bandsaw or a skill saw. A hacksaw tends to clog up unless you use a coarse blade.
The material then needs to be thinned in width to get rid of the jagged/uneven edges caused by the strips being unequal in width(unless you’re more of a robot than I).
I use both my bandsaw to take off the thinnest portions and my belt grinder with old 50/60 grit belts to even out the slabs and bring the material to its finished size.
When viewed from the side, you should only see solid material…no little “pockets” of resin. My slabs typically end up around 1 3/4 inches(4.5cm) wide.
9.
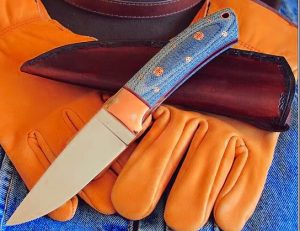
The final product is distinctive(Photo by Daniel Roberts):
We love this sort of thing on Outdoor Revival and we’ll be bringing you a lot more of it over the coming months, if you enjoy making or designing kit let us know about it on our FB page, we’re also happy for article or review submissions, we’d love to hear from you.